Slideshow
In a slideshow, you can scroll through multiple images and/or videos.
Note
The Content Enrichment function uses your browser's video player to play videos. Different browsers support different video formats. Please note the formats supported by your browser when integrating videos. If your Uptempo system is accessed with various browsers, use the MP4 video format.
You need to have the content editor open. To access the editor for a planning activity, go to the activity's detailed view and click Quick Actions > Edit general element info. For a timeline, open the Timeline Context Menu and click Details. The Edit Timeline dialog box opens.
-
Position your cursor where you want to insert the slideshow.
-
Click the
 icon.
icon. -
The Slideshow dialog box opens.
-
Click Add Image or Add video.
-
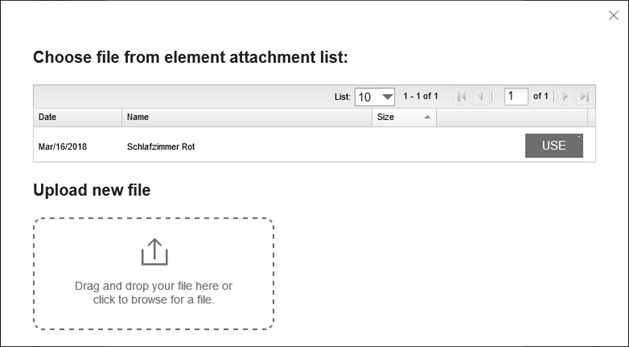
Another dialog box is displayed.

The top list shows the activity's attachments. Note that the files can be of different formats, including documents, vector graphics, etc.
-
If you do not select a video or image from the existing list of attachments, upload a new file: Add a file in the lower left area using drag and drop.
-
The file is uploaded and added to the attachment list.
-
In the attachment list, click the button next to the image or video you want to include in the slideshow.
-
The image or video is included in the preview in the Slideshow dialog box.
-
Repeat steps 4 to 8 to add additional images and videos.
-
If the images and videos are not yet arranged in the required order, change the order:
-
Click an incorrectly positioned image or video.
-
Click Move to left or Move to right until the image or video is in the required position.
-
Repeat steps a and b until all the images and videos are in their required positions.
-
-
Edit the properties of the slideshow. Refer to the following sections for detailed information when doing so.
-
Click .
The slideshow has been added in the editor.
Note that a graphic will only be displayed correctly if it is a pixel graphic. If you have accidentally selected a file with a different format in the attachment list, a red icon with a white X will appear in the Image properties dialog box. If you close the dialog box and the editor is displayed, the  icon is displayed instead of the image. In this case, select another file.
Note that a video will only be displayed correctly if it is in a format supported by your browser. If you have accidentally selected a file with a different format, a placeholder will be displayed with a corresponding message. In this case, select another file or convert the video into a different format, e.g. MP4.
You can access the following properties in the Slideshow dialog box:
|
Name |
Description |
|---|---|
|
Title |
Enter a title for the selected element. The title is displayed below the element in the slideshow. |
|
Scale |
If this checkbox is activated, the element is displayed in full screen mode. Note that this may distort the image or video if its proportions do not match the proportions of the slideshow. |
|
Actions |
You can use the Move to left and Move to right buttons to position the image or video in the slideshow. You can choose Remove to delete the image or video from the slideshow. The image or video is retained as an attachment of the planning activity. |
|
Name |
Description |
|---|---|
|
Width of the tooltip |
Enter the width in pixels for the display in the additional information |
|
Height of the tooltip |
Enter the height in pixels for the display in the additional information |